 Graphic Design Courses
There are many techniques for creating stunning black and white images in Photoshop. We show you several of these in our Photoshop beginners’ courses.
You could, of course, simply desaturate the colour information out of the image, but there are other, equally simple techniques that will give greater tonal depth and dynamism to the image. Here are just two methods you could try.
First of all we should Duplicate the image in the Image drop-down menu. This will allow us to compare our results. Then Window > Arrange > Tile. Alternatively we could take Snapshots of each technique in our History panel. 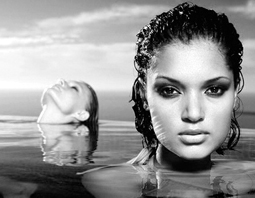
The first method is by using the Lightness channel. On the first image go to: Image > Mode > Grayscale > Discard. This is your basic desaturated version. Not terribly dynamic – a bit bland in fact. On the second image, go to: Image > Mode > convert to Lab color. Then go into your Channels panel and select the Lightness channel. Then: Image > Mode > Grayscale > OK. If it’s too light: Layers > Ctrl+J > Blend mode: Multiply. If it’s too dark: Layers > Ctrl+J > Blend mode: Screen. Lower the opacity of the top layer to 65%, for example. As you can see, this method gives you more control and depth than simply converting to grayscale.
The second method is the Black & White Converter. Introduced in CS3 it’s better than the Channel Mixer. Open a new image, and as before, go to Image > Duplicate, and Window > Arrange > Tile. Then go to Layers > New Adjustment layer > Black & White. It applies default settings. Note the presets – try these – they are ok. Return to Preset: None (or press Alt to turn Cancel to Reset).
Click Auto – this is a good starting point. A problem with the Channel Mixer was working out which slider affected which area. But in this dialog we can move the cursor onto the photo, then click & drag to the left for darker or to the right for lighten. If the change is very subtle, click & drag and note which slider is affected. Then use the slider itself. Click Tint > adjust Saturation. To save these settings click the small button to the right of Presets > OK. Lastly, go into the Layers panel and adjust the mask with a black or white soft-edged brush.
Many more tips and techniques can be found at the Adobe website. See many examples of our clients’ work on our Facebook page.
Other related Photoshop Blog Posts:
Photoshop black and white
Feb23
