Creating a Quick Mask in Adobe Photoshop is a versatile method of making selections, and just one of the selection techniques we explore in our Photoshop courses.
The images you see on your computer screen or any digital device are composed of pixels, each of which has a number for colour and brightness values. These pixels (or rasters) is how the image data is stored and transmitted. And these grids of pixels are also called bitmaps in the sense that they are maps of bits of information.
You can do just about anything to an image in Photoshop, but first you need to select an area of pixels, and there are variety of methods for doing so. The most common initially are the standard selection tools, of which there are nine, situated at the top of your Toolbox. Once an initial selection has been made you can tweak it in the Refine Edge dialog box – see a related blog post for more information on this.
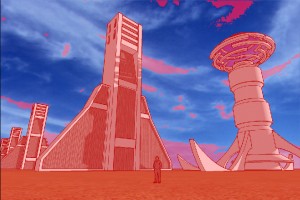
But refinements can be made to your selection by using the Quick Mask function. The image above is a futuristic scene created in SketchUp, which is a very user-friendly program to learn and work with. See our blog posts on this program, which we also teach. The red area is not part of the image as such – this is what you see when you turn on the Quick Mask function of Photoshop.
In the example here, for example, we want to change the tone or colour of the sky. A general rule of thumb in Photoshop is to select the easiest part of the image first, which is the blue of the sky. In this case we would select the Magic Wand (Tolerance 32) or the Quick Selection tool and click in the area of the blue sky. We could then add to the selection by pressing Shift and clicking in further patches of sky. And so we achieve our selection.
However, we may want to tweak it further. So we click on the Quick Mask tool at the bottom of the Toolbox, or hit the shortcut Q. The area not selected is filled with red – this is known in the photographic industry as a rubylith. You then switch to the Paintbrush tool and, using a black or white brush, paint on the image to either add or subtract from your selection. This is a versatile way of adjusting your selection because you can change the size and hardness of your brush according to the edges you wish to select. If you go too far in one direction just switch colours by pressing X on your keyboard. Every so often hit Q to toggle between selection and quick mask mode.
If you’re working on a predominantly red image, making it difficult to see the red overlay, you can also change the colour of the rubylith by double-clicking on the Quick Mask tool. It takes a bit of practice but, as you will soon see, using Quick Mask is a very handy feature to master. Many more tips and techniques can be found at the Adobe website. And see many examples of our clients’ work on our Facebook page.
Other related Photoshop Blog Posts:
Photoshop quick mask
May24

 Graphic Design Courses