
by Design Workshop Sydney
Dec21
Making colour adjustments to an image in Photoshop is a simple process – we show you how in our Adobe Photoshop courses. The first part of the process is to make a selection – in this example we have chosen the Elliptical Marquee tool and set the Feather value to 2 or 3 pixels on the top Control panel, which... Read more...
by Design Workshop Sydney
Dec7
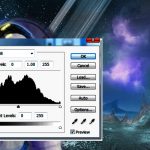
When you add a new image to a web banner or image for print you should always check the tonal Levels and possibly the Hue/Saturation. This will improve the image in the majority of cases and give you a more dynamic end result. We demonstrate how in our Adobe Photoshop courses. The reason for this is that digital cameras often... Read more...

by Design Workshop Sydney
Nov22
Adding images in Photoshop is easy if you follow a few simple guidelines. We explain how in our Adobe Photoshop courses. We usually set up our blank page or banner first. Then open one or two images to bring into the blank page. If you require the image to fill your canvas, go to the top drop-down menus and choose... Read more...

by Design Workshop Sydney
Nov11
Creating web banners in Photoshop is a simple step-by-step process. We discuss it in full in our Adobe Photoshop courses. The web banner here was created by first choosing a web size from the File > New document dialog box. Choose the Web the drop-down list, and see various common banner sizes in pixels. If you have a different banner... Read more...

by Design Workshop Sydney
Oct26
Objects and text created in Photoshop can be enhanced easily by adding drop shadows and similar layer effects. We demonstrate how in our Adobe Photoshop courses. For example the image shown here was created using the Type tool and the Lasso tool. The text is created with the Type tool, then a Warp text option is chosen from the dialog... Read more...

by Design Workshop Sydney
Oct12
Using Photoshop to combine elements into a collage is a easy process, involving layers, masks, blending modes and colour adjustments. We show you how in our Photoshop courses. This illustration was put together in about 15 minutes from three downloaded source images: a planet scape, a space suit and a model’s head. First create a new document in Photoshop, for... Read more...

by Design Workshop Sydney
Sep28
Cutting things out in Photoshop is sometimes easy and sometimes difficult, depending mostly on the background colours. The Magic Wand tool is one the easiest tools to use – we show you how in our Adobe Photoshop courses. Making selections is the hardest thing to do in Photoshop, but once made, you can do virtually anything with the image. Among... Read more...

by Design Workshop Sydney
Sep15
The History brush in Photoshop is used for fixing blemishes and errors created in the retouching process, but it can also be used to create new effects. We show you how in our Adobe Photoshop courses. Say you’re halfway through editing an image. Now open the History panel: Window > History. This shows you a list of all the steps... Read more...

by Design Workshop Sydney
Sep1
One of the main uses for Adobe Photoshop is in retouching images for commercial printing. We show you some useful and easy techniques in our Photoshop courses. In our example here we do several processes – first adjusting colours and tones, then removing blemishes and adding a necklace and the company logo. Firstly, to adjust all the colours: go to... Read more...

by Design Workshop Sydney
Aug17
Digital photographs created in low light or with high ISO settings or a cheap camera will create noise in the image. We can perform a lot of noise reduction in Photoshop. This is one of the many topics we explore in our Adobe Photoshop courses. The Reduce Noise filter was first introduced in Photoshop’s CS2 version, so it’s been around... Read more...
 Graphic Design Courses