 Graphic Design Courses
The SketchUp workspace is very simple and similar to many Windows-type programs. In our SketchUp courses we examine all the main functions and features of the program. The main part of the interface is of course the model itself; by default we have three axes, a ground plane, a sky and a human figure.
Above this we have the toolbar with various tools fo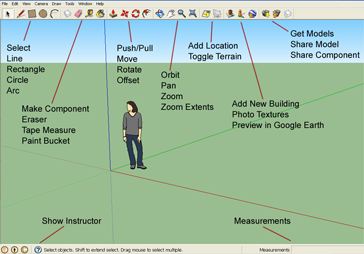 r drawing shapes, modifying shapes, navigation and importing. Hold your cursor over each tool to see a small tooltip which reminds you what that tool is used for. To get easy access to other tools, go to: View > Toolbars > Large Toolset. We will explore what these tools do in later SketchUp blog posts. Additional tips and techniques can be found on Trimble’s SketchUp website.
Above this, at the top of the screen, we have the standard drop-down menus which will be familiar from other programs. In the File menu, for example, we have the Save, Open, New, and Print options. At the bottom of the File menu are the titles of the last few models you were working on, for easy access.
At the bottom right of the screen we have the Measurements field. Here we can add precise measurements for lines, circles, scaling, etc. At the bottom left of the screen we have the Instructor which gives handy hints every time you choose a new tool to work with.
And that’s the basic SketchUp workspace. Additional panels appear when you choose them from the Window dop-down menu. And tabs will appear on the top left of the screen when you create Scenes. More on these in later SketchUp blog posts.
Our SketchUp courses are ideal for the beginner, providing affordable, easy and relevant introductions to using the software in the workplace.
See many examples of our SketchUp clients’ work on our Facebook page.
Other related SketchUp Blog Posts:
